Connecting to ORE Studio
Table of Contents
- 1. Overview
- 2. Getting started
- 3. The main window before login
- 4. The Connection Browser
- 5. Connecting and logging in
- 6. Connection status and reconnection
- 7. The status bar
- 8. Starting ORE Studio from the command line
- 9. Finding the application version
- 10. Running in the background and the system tray
- 11. Logging out
- 12. Conclusion
Connecting to a backend is the first task of every session, and the subject of this chapter. It traces the path from launching the application in its disconnected state to an authenticated session against a running backend. Along the way it sets out the Connection Browser and the full lifecycle of connection definitions — adding, editing, organising, securing, and storing them — the connect-and-login sequence and the ways it can fail, the status bar's account of the live connection, and the supporting material around a session: command-line options, the application version, the system tray, and logging out.
1. Overview
This chapter advances the argument that reaching a working session means starting the application, teaching it about the backends it may talk to, authenticating against one of them, and learning to read the session's state — and it proceeds in that order. It begins with Getting started, which launches the application and explains the disconnected state in which it first appears, and The main window before login, which describes what is and is not available until a login succeeds. From there it turns to The Connection Browser, the central place where backends are defined, walking through adding, editing, and deleting a connection, organising connections into folders, protecting credentials with a master password, grouping by environments and tags, and where the connection store lives and how to back it up. With a connection in place it moves to Connecting and logging in — selecting the active connection, the login screen, filtering Quick Connect by label, the distinct ways a connection can fail, the first login and default account, and registering a new account. It then covers Connection status and reconnection and the vocabulary of The status bar, so the reader can tell the connection's state at a glance. Finally it gathers the operational periphery — Starting ORE Studio from the command line, Finding the application version, Running in the background and the system tray, and Logging out — and the Conclusion draws these steps together.
2. Getting started
When you launch ORE Studio a splash screen appears briefly while the application initialises, showing the ORE Studio logo and the build version in its lower-right corner.

Figure 1: The ORE Studio splash screen shown during start-up. The build version appears in the lower-right corner.
Once initialisation completes you are greeted by the main window in its disconnected state. The application is running but has not yet established a connection to the backend service that performs calculations. Before you can work with trades, market data, or analytics, you need to connect to a running ORE Studio backend.
3. The main window before login
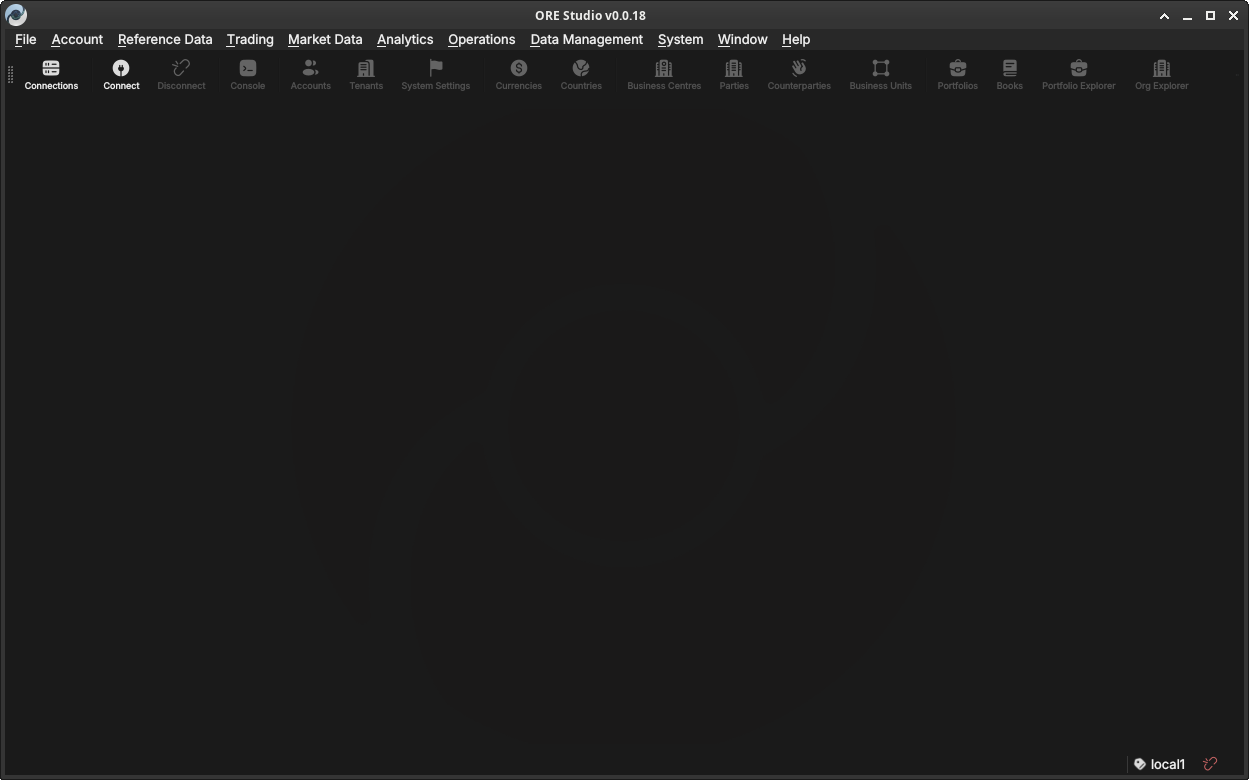
Figure 2: The ORE Studio main window immediately after launch, in the disconnected state. The toolbar shows the Connect and Connections buttons; the workspace area is empty until you log in.
In the disconnected state most of the application is inactive. The menu bar and toolbar are present but workspace panels, trade lists, and analytics views are all unavailable until a successful login. Two toolbar buttons are always accessible:
- Connect — opens the login dialog for the currently selected connection.
- Connections — opens the Connection Browser, where you configure the list of backends ORE Studio knows about.
4. The Connection Browser
The Connection Browser is the central place where you maintain the list of ORE Studio backends the application can connect to. You might have a local development backend, a shared team backend, and a staging backend — each appears as a separate entry here. It lets you add, edit, delete, and organise those entries before you attempt a login.
Open it at any time from the toolbar Connections button or from the File menu.
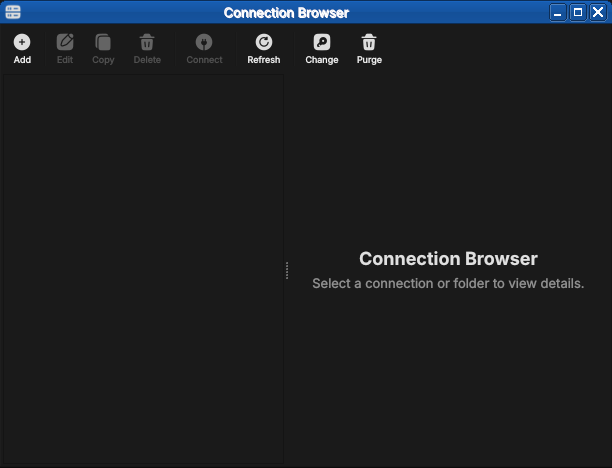
Figure 3: The Connection Browser open with no connections configured. The toolbar exposes Add, Edit, Copy, Delete, Connect, Refresh, Change and Purge; the unusable actions are greyed out until something is selected.
4.1. Adding a new connection
Click Add (or the "+" button) to open the New Connection form. Fill in the fields:
- Name — a free-text label you choose, used throughout the UI to identify this backend (e.g. "Local dev", "Team staging"). Must be unique among your saved connections.
- Host — the hostname or IP address of the machine running the ORE
Studio backend (e.g.
localhost,192.168.1.10,ores-staging.example.com). - Port — the TCP port the backend is listening on. The default is
35900; change it only if the backend was started on a different port. - Environment — an optional grouping label (see Environments below). Helps you distinguish development, staging, and production backends at a glance.
- Tags — zero or more free-text labels (see Tags below). Useful for filtering and searching when you have many connections.
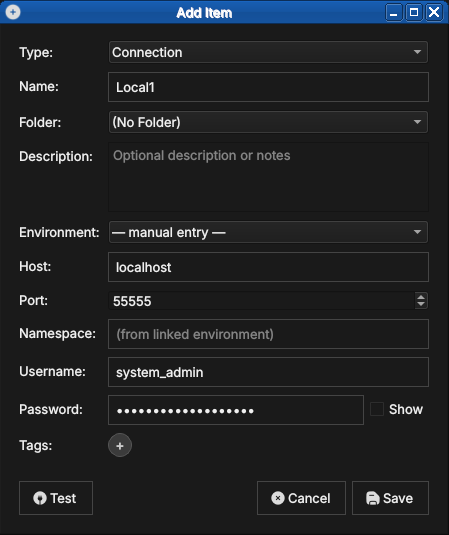
Figure 4: The New Connection form with example values filled in. Type is set to Connection; the Environment may be left as manual entry or linked to a defined environment.
Click Save (or OK) to add the connection to the list. The new entry appears immediately in the Connection Browser list. No network contact is made at this point — ORE Studio simply stores the configuration.
4.2. Editing a connection
Select an existing connection in the list and click Edit (or double-click the row) to open the same form pre-populated with the saved values. Change any field and click Save. The connection list updates immediately.
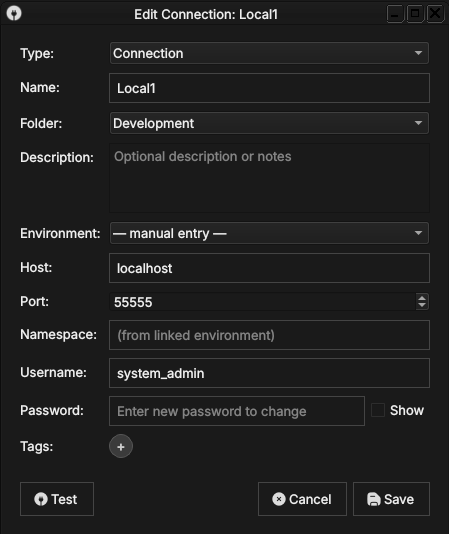
Figure 5: Editing a saved connection. The dialog title shows Edit Connection, the fields are pre-populated, and the password field reads Enter new password to change — the stored password is preserved unless you type a replacement.
4.3. Deleting a connection
Select one or more connections in the list and click Delete (or press the Delete key). A confirmation dialog asks you to confirm the removal.
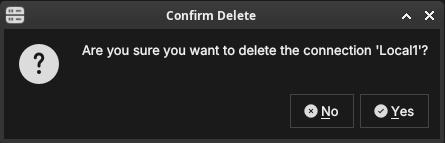
Figure 6: The delete confirmation dialog. ORE Studio names the connection being removed and waits for you to confirm with Yes or cancel with No.
Deleting a connection removes only the saved configuration; it has no effect on the running backend or any data stored there.
4.4. Organising connections into folders
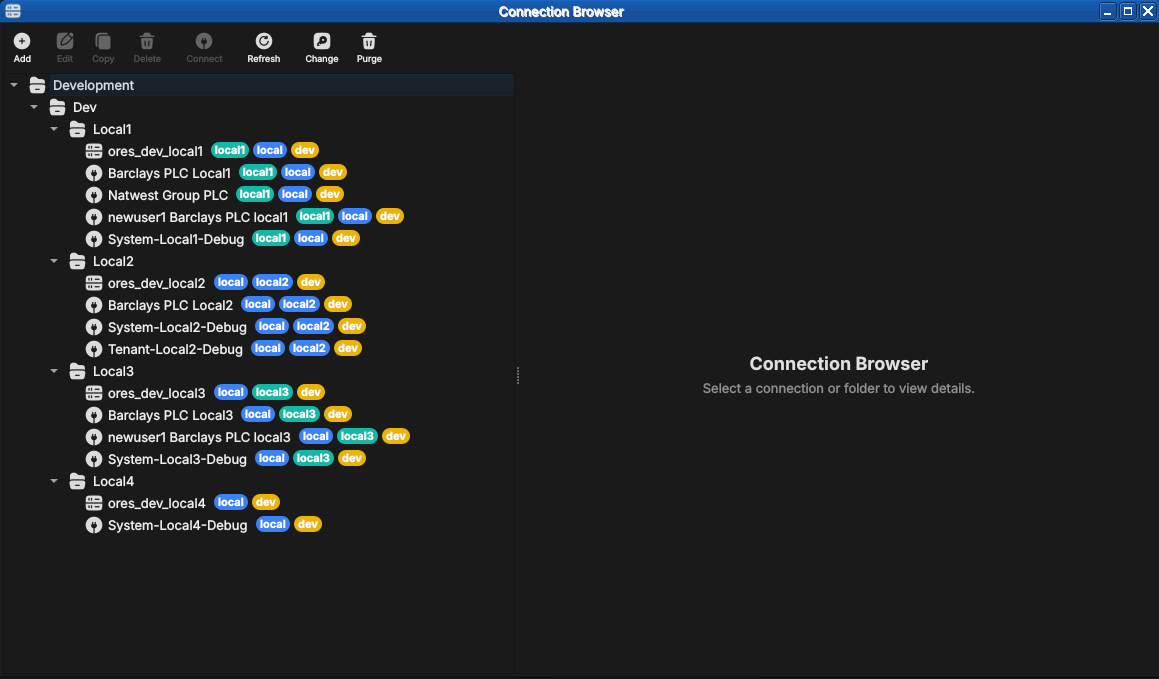
Figure 7: A populated Connection Browser. Connections are grouped under folders (here Development → Dev → Local1…Local4) and each carries coloured chips — the environment and tags — making the tier and purpose of every entry obvious at a glance.
When the list grows, folders keep it manageable. A folder is a named
container you can nest, grouping related connections — by team, by
client, or by environment tier. In the populated browser above, the
connections sit under a Development → Dev → Local1…Local4 folder tree.
To create one, click Add and set Type to Folder. Give it a name and
an optional description, and choose a parent folder (or No Folder to
place it at the top level). Connections are then assigned to a folder
through their Folder field, or by dragging them in the tree.
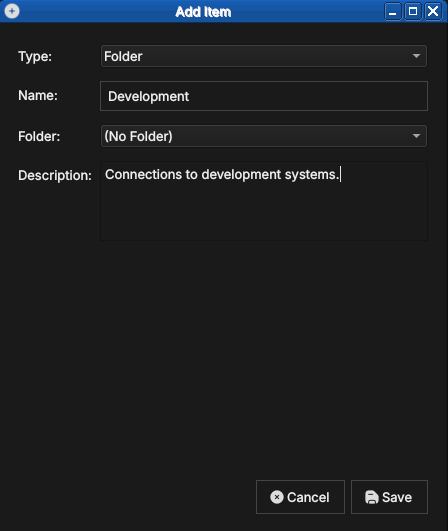
Figure 8: Creating a folder. With Type set to Folder, a folder needs only a name and an optional description; it can be nested inside another folder.
4.5. Protecting your credentials with a master password
The passwords you save with a connection are encrypted at rest using a master password that you choose. The first time you save a credential, ORE Studio offers to create one.
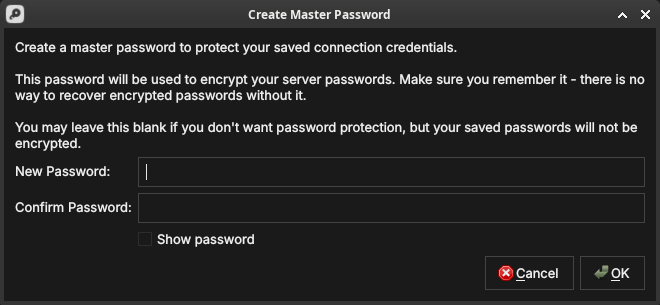
Figure 9: Creating the master password. It encrypts every saved server password; there is no recovery if you forget it, so you may also leave it blank to store passwords unencrypted.
Type the same value into New Password and Confirm Password; the fields turn green when they match. Show password reveals what you typed.
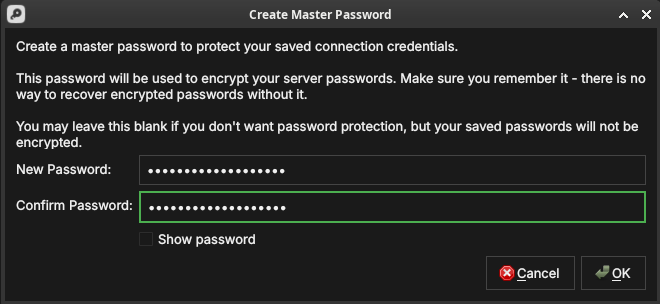
Figure 10: The master password confirmed — both fields match and are outlined in green, ready to accept with OK.
When you next launch ORE Studio and open the Connection Browser, it prompts you to unlock your saved connections by entering the master password. Until you do, the encrypted passwords stay sealed.
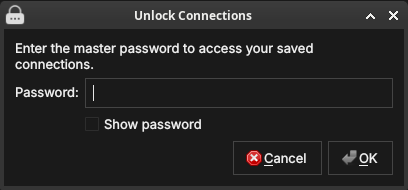
Figure 11: The unlock prompt shown on a later launch. Enter the master password to decrypt your saved connection credentials.
If you leave the master password blank, your connections still work but their passwords are stored unencrypted — acceptable on a personal machine, but not recommended on shared or portable systems.
4.6. Environments
An environment is a named grouping that you assign to a connection to
indicate which tier of your infrastructure it belongs to. Typical
values are Development, Staging, and Production, but the list is
fully customisable — you can define any environment names that make
sense for your setup.
Environments appear as a coloured badge or label next to the connection name in the list, making it immediately obvious which tier you are about to connect to. This is a safety feature: it is easy to accidentally connect to production when you meant staging; a clearly labelled environment badge prevents that.
See the populated Connection Browser figure under Organising connections into folders above — the same coloured chips shown there are the environment and tag labels described below.
To manage the available environment names, open the Environments section within the Connection Browser settings (or the dedicated menu item). From there you can:
- Add a new environment name and choose its display colour.
- Rename an existing environment (all connections using it update automatically).
- Delete an environment (connections that used it revert to Unassigned).
An environment is itself created from the Connection Browser: click Add
and set Type to Environment. An environment carries its own host,
port, HTTP port, namespace and tags — these become the connection details
that any connection linked to it inherits.
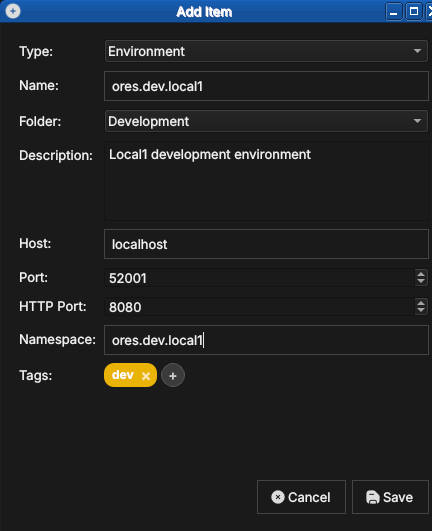
Figure 12: Creating an environment. With Type set to Environment, you give it a name, folder, host, ports, namespace, and tags (here a dev tag).
Once an environment exists, a connection can link to it by selecting it in the connection's Environment field instead of manual entry. The connection then inherits the environment's host, port, and namespace, so you maintain those details in one place.
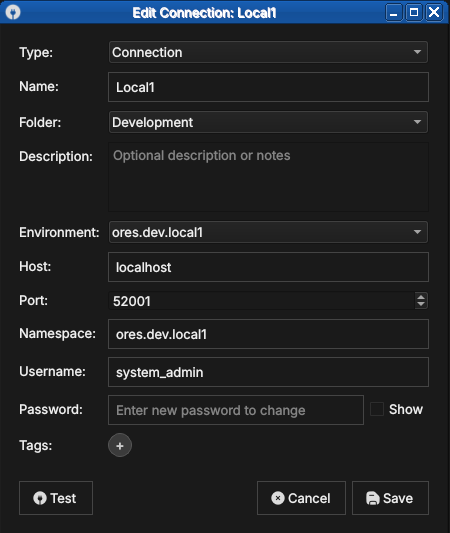
Figure 13: A connection linked to an environment. Selecting ores.dev.local1 in the Environment field populates the host, port and namespace from that environment.
4.7. Tags
Tags are free-text labels you attach to a connection to enable
flexible filtering and search. Unlike environments (which represent a
single tier), a connection can carry any number of tags. Examples:
personal, client-acme, read-only, high-memory.
Tags are displayed inline with the connection name in the list. The Connection Browser provides a tag filter bar at the top of the list: type or select a tag to show only the connections that carry it.
To add or remove tags, open the Edit form for the entry and use the Tags field. Type a new tag name and press Enter (or comma) to add it; click the × on an existing tag chip to remove it. Tags are created on first use — there is no separate tag management screen.
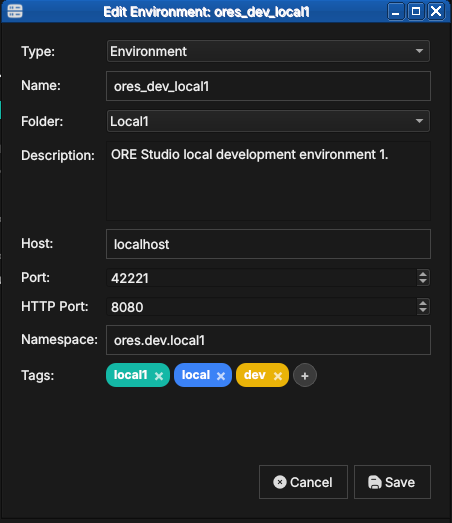
Figure 14: Tags shown as coloured chips in an entry's Edit form (here the ores_dev_local1 environment, tagged local1, local and dev). Add tags in the Tags field, remove one with the × on its chip, or click + to add another.
4.8. Where your connections are stored
ORE Studio keeps your connections — together with their environments,
folders, and tags — in a single local SQLite database file named
connections.db. Your UI settings (preferences and window layout) are
stored separately, in the operating system's standard settings store.
Neither leaves your machine.
- Linux:
- settings in
~/.config/OreStudio/; - database at
~/.local/share/ores.qt/connections.db.
- settings in
- macOS:
- settings in
~/Library/Preferences/; - database at
~/Library/Application Support/ores.qt/connections.db.
- settings in
- Windows:
- settings in registry:
HKCU\Software\OreStudio\OreStudio; - database at
%APPDATA%\ores.qt\connections.db.
- settings in registry:
If connections.db is missing when ORE Studio starts, it creates a new
empty one — so the Connection Browser simply opens with no entries.
4.9. Backing up and restoring your connections
Because everything you configure here lives in that one connections.db
file, backing it up is a file copy:
- Quit ORE Studio, so the database is fully written and not locked.
Copy
connections.dbfrom the location above to a safe place — on Linux, for example:cp ~/.local/share/ores.qt/connections.db ~/connections-backup.db
To restore, quit ORE Studio and copy the backup back over
connections.db. To move your connections to another machine, copy the
file to the same location there. The file is self-contained, so a single
copy preserves all your connections, environments, folders, and tags.
5. Connecting and logging in
Once you have at least one connection configured, you can log in.
5.1. Selecting the active connection
In the Connection Browser, select the connection you want to use and click Set as active (or double-click it). The selected connection becomes the target for the Connect button in the main toolbar. The status bar at the bottom of the main window shows the name of the active connection.
You do not have to choose in advance, though: clicking Connect opens the login dialog directly, and its Quick Connect selector lets you pick the connection there (see Filtering Quick Connect with labels below).
5.2. The login screen
With an active connection selected, click Connect. ORE Studio attempts to reach the backend. If the backend is reachable, the Login dialog appears.
# Capture: open the login dialog for an account with more than one party, so
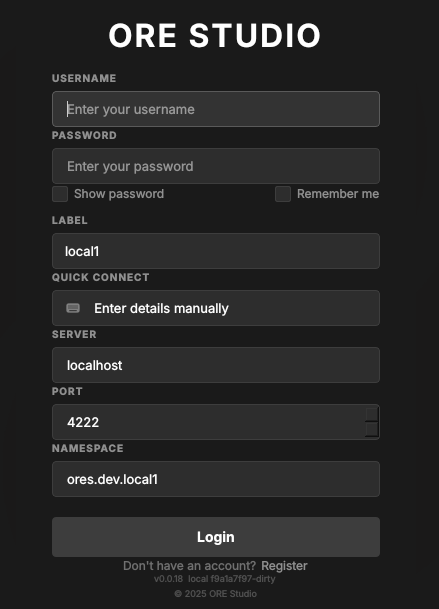
Enter your username and password and click Login. Tick Remember me to have ORE Studio recall the username next time. ORE Studio authenticates against the backend's user database. On success the dialog closes and the main window transitions to the connected state: the workspace panels become active, the menu bar is fully enabled, and the status bar shows your username and the connected backend name.
If your account spans more than one party, Log in to default party (ticked by default) skips the party-selection step and logs you straight in to the party configured as your account's default. Untick it if you want to choose the party explicitly on this login instead.
The fields below the credentials describe which backend you are logging in to:
- Label — the saved connection's name (e.g.
local1). - Quick Connect — pick a saved connection to fill Server, Port and Namespace in one step, or leave it on Enter details manually to type them yourself.
- Server, Port, Namespace — the backend address the login targets.
The Label and Quick Connect fields work together. The Label names
the environment — it defaults from the connection (or from the
--instance-name you launched with); Quick Connect then offers the
connections for that label, and picking one fills in Server, Port and
Namespace so you do not have to type them.
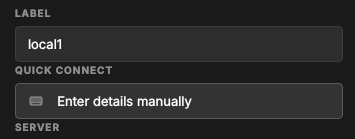
Figure 15: The Label and Quick Connect fields. The Label selects the environment; Quick Connect offers that environment's connections and fills in the server details.
If you do not yet have an account, the Register link in the footer opens account registration. If authentication fails, an error message is shown below the password field. Check that you are using the correct credentials for this backend; each backend maintains its own user database independently.
5.3. Filtering Quick Connect with labels
With only a handful of connections, Quick Connect is easy to scan. But a real deployment soon accumulates many — several environments, each with its own system, tenant and per-party logins. Left unfiltered (the Label set to All), the selector lists every one:
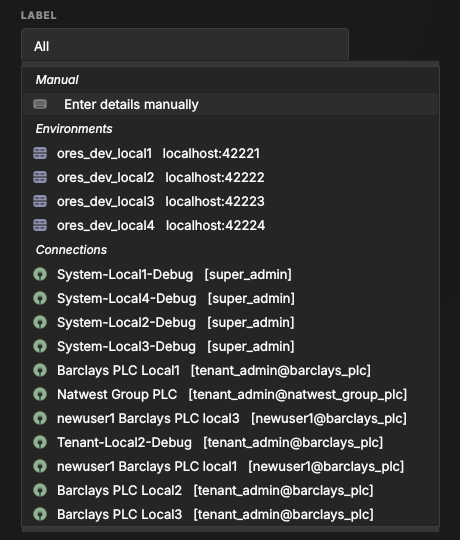
Figure 16: Quick Connect with the Label set to All — every saved connection across all environments and tenants. Hard to pick the right one at a glance.
Each connection carries a label — its environment tag, such as dev,
local1 or local2. The Label selector lists those labels; choosing
one filters Quick Connect to just the connections that carry it:
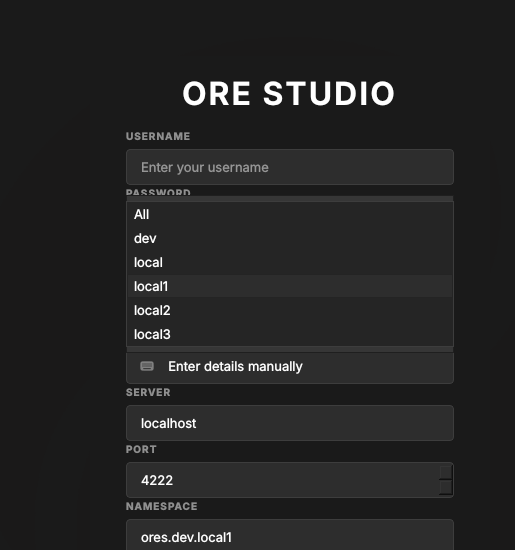
Figure 17: The Label selector lists the labels found on your connections. Pick one to narrow Quick Connect to that environment.
With local1 selected, Quick Connect shows only the local1 entries — the
environment's own database, its system and tenant logins, and its
per-party connections — so you reach the right backend without scrolling
past unrelated ones:
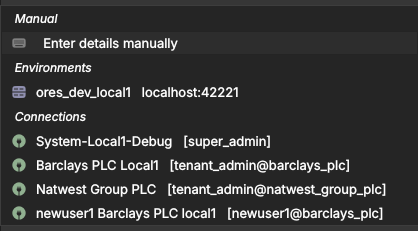
Figure 18: Quick Connect filtered to the local1 label: only that environment's connections remain.
You normally run one client per environment: a client built for local1
should connect to local1, not to staging or production. Rather than pick
the label by hand each time, set it when you launch the client — the
--instance-name command-line option (see Telling windows apart) opens
the client with the Label already set, so Quick Connect is pre-filtered
to that environment. The compass client start command does this
for you, taking the label from ORES_CHECKOUT_LABEL in your .env.
5.4. When the connection fails
Not every login failure is a wrong password. ORE Studio talks to the backend over a messaging server (NATS), and if it cannot reach that server — or the services behind it — it tells you which is wrong rather than just reporting "login failed".
If the messaging server itself is unreachable, ORE Studio reports that it cannot connect, along with the host and port it tried:
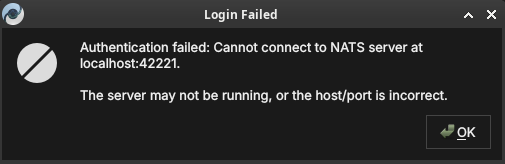
Figure 19: A login failure caused by an unreachable messaging server. The host and port ORE Studio tried are shown; the server is likely not running, or the host/port is wrong.
If the messaging server is running but the application services behind it have not started, ORE Studio says so explicitly — the fix is to start the backend services, not to change your connection:
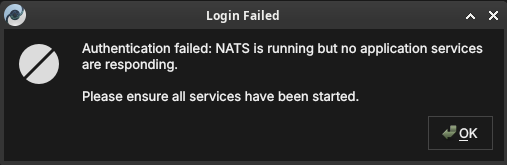
Figure 20: A login failure where the messaging server is up but no application services are responding. Ensure the backend services have been started.
In both cases your saved connection is fine; correct the backend (start the server or its services) and click Connect again.
5.5. First login and the default account
On a freshly initialised backend the only account that exists is the default administrator account. Your system administrator will have provided the initial credentials. After first login it is strongly recommended to change the password immediately via Settings → Account.
Once a tenant has been provisioned (covered in the next chapter,
Initial Setup), you log in with that tenant's administrator account —
the username takes the form user@tenant_code. Picking the connection
from Quick Connect fills in the server, port and namespace for you:
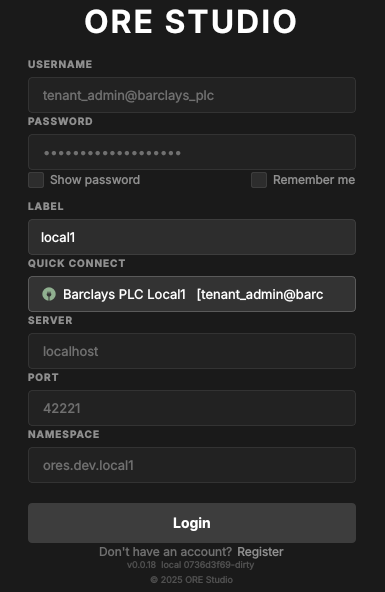
Figure 21: Logging in as a tenant administrator (tenant_admin@barclays_plc), with the connection chosen from Quick Connect.
5.6. Registering a new account
If your deployment allows it, the Register link in the login dialog footer opens the Create Account form. Fill in a username, email, and password (with confirmation), check the Server and Port point at your backend, and click Create Account. The Log in link returns to the login dialog.
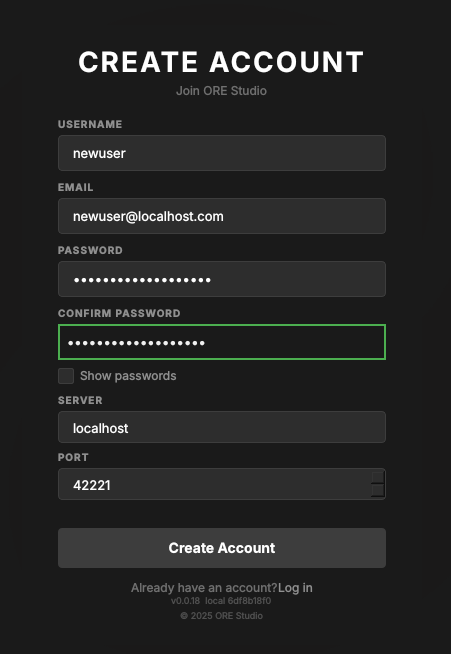
Figure 22: The Create Account form, opened from the Register link in the login dialog footer.
Self-registration is not always available: the backend must be set up to permit new users to register themselves. Where it is disabled, accounts are created for you by an administrator instead (see First login and the default account).
Account registration currently fails with Account creation failed: NATS
connect failed: SSL Error — the registration path's NATS/TLS connection
does not succeed. Until this is fixed, ask an administrator to create your
account. The fix is tracked in Fix account registration NATS SSL error.
6. Connection status and reconnection
The status bar always shows whether you are connected. After a deliberate log-out — or once a stopped backend is running again — use the Connect button to re-establish the session: your saved connection is retained, so you only re-enter your password.
ORE Studio does not yet reliably detect a backend that drops while you are logged in. If the messaging server (NATS) or the services behind it are stopped mid-session, the client may keep looking connected until your next action fails or hangs. Detecting the drop and showing a clear connection-lost state is planned work, tracked in Detect and report NATS disconnection.
7. The status bar
The status bar runs along the bottom of the main window and provides a continuous read on the application's connection state. It is always visible regardless of what is open in the workspace.

Figure 23: The status bar in the fully connected, logged-in state: from left to right, the environment marker (local1), the username (super_admin), the server (localhost:42221), the active party (Root / System Party), and the green connected indicator.
The status bar is divided into zones from left to right:
- Connection name — the name of the active connection as entered in the Connection Browser (e.g. "Local dev"). Clicking this zone opens the Connection Browser directly.
- Environment badge — the coloured environment label (e.g.
Productionin red) if one is assigned to the active connection. Absent when no environment is set. This is the most prominent safety indicator: always glance at the environment badge before performing any write operation. - Username — the account name of the currently logged-in user. Absent in the disconnected state.
- Server — the backend address (host and port) the session is
connected to, e.g.
localhost:42221. - Active party — the party context for the session (e.g.
Root/System Party), set at login when your account spans multiple parties. - Connection indicator — a coloured icon at the right showing the live link state (green when connected).
The status bar changes appearance to reflect the connection state:
- Disconnected (no active connection) — grey; shows "Not connected".
- Connecting (handshake in progress) — animated indicator; shows "Connecting to /name/…".
- Connected and logged in — normal; shows all zones as described above.
A distinct connection lost state for a backend that drops mid-session is planned but not yet implemented — see Connection status and reconnection above.
In the disconnected state the strip is reduced to the environment marker and the connection label, with the broken-link icon on the right:
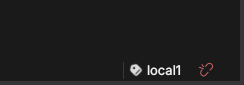
Figure 24: The status bar in the disconnected state, showing the environment marker, the connection label (local1), and the broken-link indicator.
The connected state is shown at the start of this section. Compare it with the disconnected strip above to recognise at a glance which state the application is in.
8. Starting ORE Studio from the command line
ORE Studio can be launched directly from a terminal, which is useful for
scripting, for telling several windows apart, or for pointing the
application at a non-default configuration directory. Run ores --help
to see the full list of accepted options for your installed version; the
most commonly used ones are documented below.
ores --help
8.1. Telling windows apart (instance colour and name)
When you run more than one ORE Studio window at once — for example against different backends, or from separate checkouts — you can give each window a distinct identity so you can tell them apart at a glance. This is not a light/dark theme; it is purely a per-window marker.
--instance-color HEXdraws a small coloured circle in the status bar in that colour (a 6-digit RGB hex, e.g.F44336for red). Give each window a different colour.--instance-name NAME(short form-n) labels the window with a name, also shown in the status bar, so you can see which window is which.
ores --instance-name "Local dev" --instance-color 2196F3
--instance-name does more than label the window: it also sets the
login dialog's Label field on start-up, pre-filtering Quick
Connect down to just that label's connections instead of showing
every saved connection across every environment — see Filtering Quick
Connect with labels above.
The colour and the name are independent: the colour is only a visual
marker, and the name is what identifies the instance. If you launch via
compass client start, its --colour red|green|blue|<hex>
sets the marker colour and --name sets the instance name; when you omit
--name, the name comes from ORES_CHECKOUT_LABEL in your .env — never
from the colour.
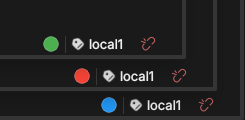
Figure 25: The status bars of three windows running the same local1 instance, each given a different --instance-color (green, red, blue) so you can tell them apart at a glance.
8.2. Configuration directory
By default ORE Studio stores its UI settings — preferences and window
layout — in the operating system's standard settings store. The exact
per-OS locations are listed under Where your connections are stored;
your saved connections live separately in connections.db. To use a
different directory:
ores --config-dir /path/to/config
This is useful when running multiple isolated instances, or when keeping configuration under version control for team-shared settings.
8.3. Selecting a connection at startup
To bypass the Connection Browser and connect immediately to a named connection:
ores --connection "Local dev"
ORE Studio will start, set the named connection as active, and open the login dialog automatically. The connection name must match exactly (case-sensitive) a saved entry in the Connection Browser.
8.4. Logging and diagnostics
For troubleshooting, verbosity can be increased:
ores --log-level debug    # verbose output to stdout
ores --log-file /tmp/ores.log  # write log to a file instead
Log output includes connection lifecycle events, authentication
attempts, and backend protocol messages. The debug level is intended
for issue reporting and development; it produces high-volume output and
should not be left enabled during normal use.
9. Finding the application version
Knowing exactly which build you are running matters when reporting an issue or checking client/backend compatibility. ORE Studio shows its version in several places.
The title bar of the main window always shows the version next to the application name:

Figure 26: The version in the main window title bar, alongside the full menu bar and toolbar of the connected application.
It also appears in the lower-right corner of the splash screen at start-up:

Figure 27: The build version in the lower-right corner of the splash screen.
…and in the footer of the login dialog, below the Register link:
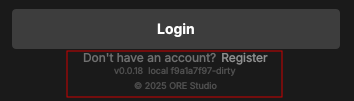
Figure 28: The version string in the login dialog footer, beneath the Register link.
From the command line, ores --version prints the client version string
(e.g. ORE Studio 0.0.19) and exits — handy in scripts or when filing a
bug report.
ores --version
10. Running in the background and the system tray
While ORE Studio is running it places an icon in your desktop's system tray (notification area). The icon keeps the application reachable when its window is minimised or hidden, and shows the instance name so you can tell multiple windows apart.

Figure 29: The ORE Studio icon in the system tray, labelled with the instance name so you can identify the window it belongs to.
11. Logging out
To end your session, choose File → Log Out or click the Disconnect toolbar button. ORE Studio closes the connection to the backend and returns to the disconnected main window. Your saved connection configurations are preserved; you can log back in at any time.
Logging out does not stop the backend service — it only terminates your client session. Other users connected to the same backend are unaffected.
To close the application entirely, quit the window (or choose File → Exit). ORE Studio asks you to confirm so you do not lose an active session by accident:
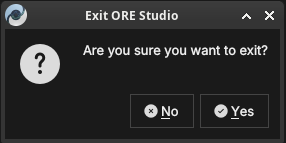
Figure 30: The exit confirmation. Click Yes to close ORE Studio, or No to keep working.
12. Conclusion
The chapter set out to show that reaching a working session follows from starting the application, defining the backends it may talk to, authenticating against one, and reading the session's state in turn, and it has traced exactly that path. It began at the disconnected main window, where nothing but the Connect and Connections actions is available, and used the Connection Browser to build up the set of known backends — adding and editing entries, organising them into folders, sealing their credentials behind a master password, and grouping them by environment and tag, all held in a single local store that travels with a file copy. Building on that, the connect-and-login sequence took a configured connection through to an authenticated session, with Quick Connect and labels narrowing the choice and the distinct failure messages distinguishing a wrong password from an unreachable server. The status bar then gave the session a continuous, glanceable account of its own state, and the command-line options, version markers, system tray, and log-out path filled in the operational periphery. The reader can now reach a live backend; the next chapter covers what must happen before a brand-new backend is usable at all: provisioning.